

How to Build a DIY Golf Enclosure for Your Home Simulator

Golf is no longer a sport limited to sunny days on the green. Thanks to golf simulators and enclosures, you can now practice your swing from the comfort of your home rain or shine. A DIY golf enclosure lets you create a personalized indoor setup that fits your space, budget, and goals, without compromising on performance. Whether you’re a casual golfer looking to stay sharp in the off-season or a dedicated player aiming to perfect your game, building your own golf simulator enclosure can be an exciting and rewarding project.
In this guide, we’ll walk you through everything you need to know from planning your space to choosing the right materials to help you design the ultimate indoor golf enclosure.
Why a Golf Enclosure Is a Game-Changer
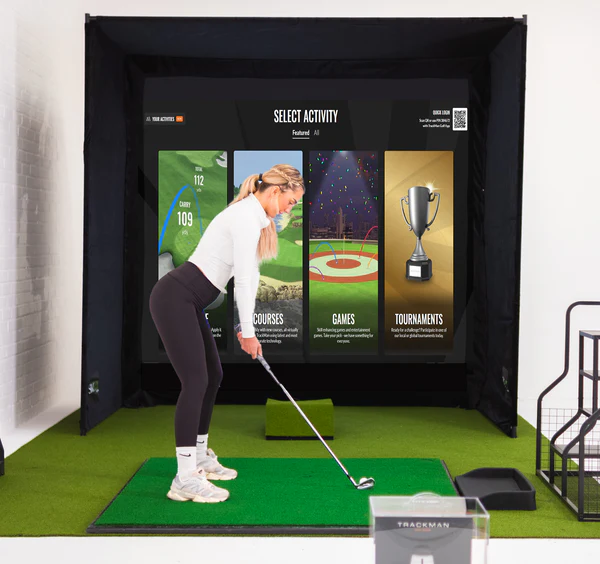
A golf enclosure is more than just a net and screen; it’s the foundation of a realistic and immersive golf simulator experience. The enclosure safely contains your golf balls while providing a smooth projection surface for your simulator. It allows you to swing freely without worrying about damage to your surroundings and gives you the confidence to practice any shot indoors.
For many golfers, the biggest advantage of an at-home enclosure is convenience. No more scheduling range sessions or depending on weather conditions you can play 18 holes at Pebble Beach or practice your short game anytime you like.
Finding the Right Equipment for Your Setup
Before diving into the build, you need to choose the right components for your enclosure. The main elements include:
-
Impact screen: A durable screen that can handle high-speed ball impacts and display crisp visuals.
-
Frame: Typically made from steel or aluminum pipes, it provides stability and shape to your enclosure.
-
Netting: Protects surrounding areas from stray shots.
-
Projector and simulator system: Creates a lifelike golf experience.
If you’re looking for premium-quality materials, it’s worth checking out SimSpace discount codes to save on your setup. Sim Space sells high-quality golf enclosures and practice nets designed for use with simulators. They also offer various sim box sizes to match your available space making it easier to build a setup that looks professional while staying within budget.
Step-by-Step Guide to Building Your DIY Golf Enclosure
1. Measure Your Space
Start by measuring your room carefully. You’ll need a minimum ceiling height of 8.5 to 9 feet for comfortable swings, though 10 feet or higher is ideal. The recommended space dimensions are roughly:
-
Width: 10–12 feet
-
Depth: 10–15 feet
-
Height: 9–10 feet
Ensure there’s enough room behind the hitting area for your backswing and in front of the impact screen for safe ball flight.
2. Choose a Frame Design
Most DIY enclosures use 1-inch EMT (electrical metallic tubing) or steel/aluminum pipes for the frame. You can buy these from hardware stores and cut them to your desired length. Use corner fittings or elbow connectors to assemble the rectangular frame.
Tip: For easy assembly and storage, label each pipe section and use quick-connect fittings instead of permanent welds or screws.
3. Install the Impact Screen
Attach your impact screen to the front of the frame using bungee cords or zip ties. This allows the screen to flex slightly on impact, reducing wear and tear. Make sure the screen is tightly secured but not stretched too much tension can cause tearing or distortion of projected images.
You can find high-quality, impact-resistant screens made of polyester or Kevlar blend fabric that offer durability and a clear projection surface.
4. Add Protective Netting
Install side and ceiling nets to catch any mishits. You can hang the nets from the same frame using hooks or clips. This not only keeps your space safe but also gives your setup a clean, professional appearance.
Black netting tends to blend well with surroundings and improves the contrast of projected visuals.
5. Set Up Your Simulator and Projector
Once your frame and netting are secure, position your launch monitor or simulator system behind the hitting area. Calibrate it according to your manufacturer’s instructions for accurate tracking.
Mount your projector overhead or just behind you, angled toward the impact screen. Adjust the brightness, distance, and focus for a crisp, immersive image.
6. Flooring and Hitting Mat
To mimic real turf and protect your floor, install a quality golf mat and carpet tiles or foam flooring underneath. This not only enhances your simulator experience but also minimizes noise and impact on the floor.
Consider a mat with realistic fairway and rough sections to improve your practice sessions.
7. Add Final Touches
Once your enclosure is up, personalize your space! Add LED lighting, wall padding, or even a sound system for an authentic golf lounge feel. A small seating area or mini fridge nearby can make it a perfect retreat for friends and family.
Maintenance Tips for Longevity
-
Inspect your screen and netting regularly for signs of wear.
-
Clean your projector lens and screen to keep visuals clear.
-
Store your clubs properly and avoid leaving balls inside the enclosure to prevent damage.
-
Re-tension bungees every few weeks to maintain proper screen alignment.
A little maintenance goes a long way in keeping your DIY setup looking and performing like new.
Why Choose a DIY Setup Over Pre-Built Kits?
While pre-built enclosures are convenient, DIY builds offer flexibility, cost savings, and customization. You can choose your materials, design the layout that fits your space, and still achieve professional-level performance.
Plus, DIY projects often cost 40–60% less than ready-made enclosures, allowing you to allocate your budget toward a better simulator or projector system.
Final Thoughts
Building your own golf enclosure is one of the best investments you can make as a golf enthusiast. It gives you the freedom to practice whenever you want, in a space that fits your lifestyle and personality. With a thoughtful plan, quality materials, and a bit of creativity, your DIY golf simulator can rival even the most premium setups.
If you’re ready to get started, explore the range of enclosures and nets from Sim Space. Their customizable options and premium materials make building your dream setup easier and more affordable than ever.
With your own golf simulator at home, you’re not just improving your swing, you're creating a personal golf sanctuary that brings the course to you.
